

When I listen to recorded music, there are two production elements that really grab my attention… A great drum sound… and killer vocals! In this article, How To Mix Vocals, I’ll be disclosing some trade secrets in the art of vocal production. Let’s dive in!
In my profession, I’ve had the opportunity to listen to hundreds of DYI recordings and mixes from emerging talent, and have noticed a very common thread… Before I address it, I want to share my story, in which I was stuck in the same place as many of these DYIers.
 I began my journey as a sound engineer in the late 90s, recording to an old, taped based Tascam 4 track. I entered the industry at a time when analog tape was on the way out… and truth be told, haven’t worked on much tape since those humble days in the bedroom studio.
After a couple of years of dabbling, I studied Audio Production at RMIT, graduating from the 4 track to Pro Tools version 5! This was at a time when the studio system would run out of power after a single reverb effect and a few compressors and EQs!
So, how does this relate to you? Well, let me share my ‘typical’ mixing process from the early days:
- Start with the drums – Gate/Compress/EQ/Blend samples/Design snare reverb/Design ‘room’ reverb/Balance/Refine – I would do this for hours
- Move on to the bass – Compress/EQ/Add FX/Duck with the kick drum – Again, I would spend a lot of time
- Process the guitars, piano, synths, glitch, strings, brass, keys, percussion… and on and on for hours!
Then I would get to the lead vocal. At this point, I was somewhat stumped as to what to do. I thought, “Well, I guess I just compress it, add some EQ, find a nice reverb sound and automate (automation) the level…”.
Now don’t get me wrong, I spent some time doing this to the vocals… but much less time than I spent on everything else. And THIS is the common thread I’ve heard in hundreds of demos and ‘home produced’ recordings. This is the underwhelming sound of, half-baked vocals.
The problem with under produced vocals is that the ‘typical‘ listener connects with the vocal more than any other sound. I had my ratio backward, and from the moment I recognised this, I learned and developed ways to give the lead vocal even more attention than the drums and other instruments.
I want to share my process with you, so you can consider ways to improve your vocal production, and improve your mixes.
When you produce mixes with a killer vocal sound, you immediately increase your perceived experience as an engineer
OK, time do do some listening. Here are two versions of the same song, Day To Waste, by talented, Sydney based artist, John Vella.
This version was mixed at home by the artist.
This is the version I mixed at ninety nine 100.
Other instruments aside, if you focus on the vocal production, you should hear a noticeable difference between the two mixes. I recommend using a good set of headphones or speakers.
Now the ONLY difference in the vocal production between the two mixes is the signal chain… In other words, it is the same ‘source’ vocal track in both versions. The difference you are hearing between the sound of the two, is how I have split the vocal, sent it to various effects, and blended them back together. My signal-chain.
Signal-chain for Day To Waste lead vocals
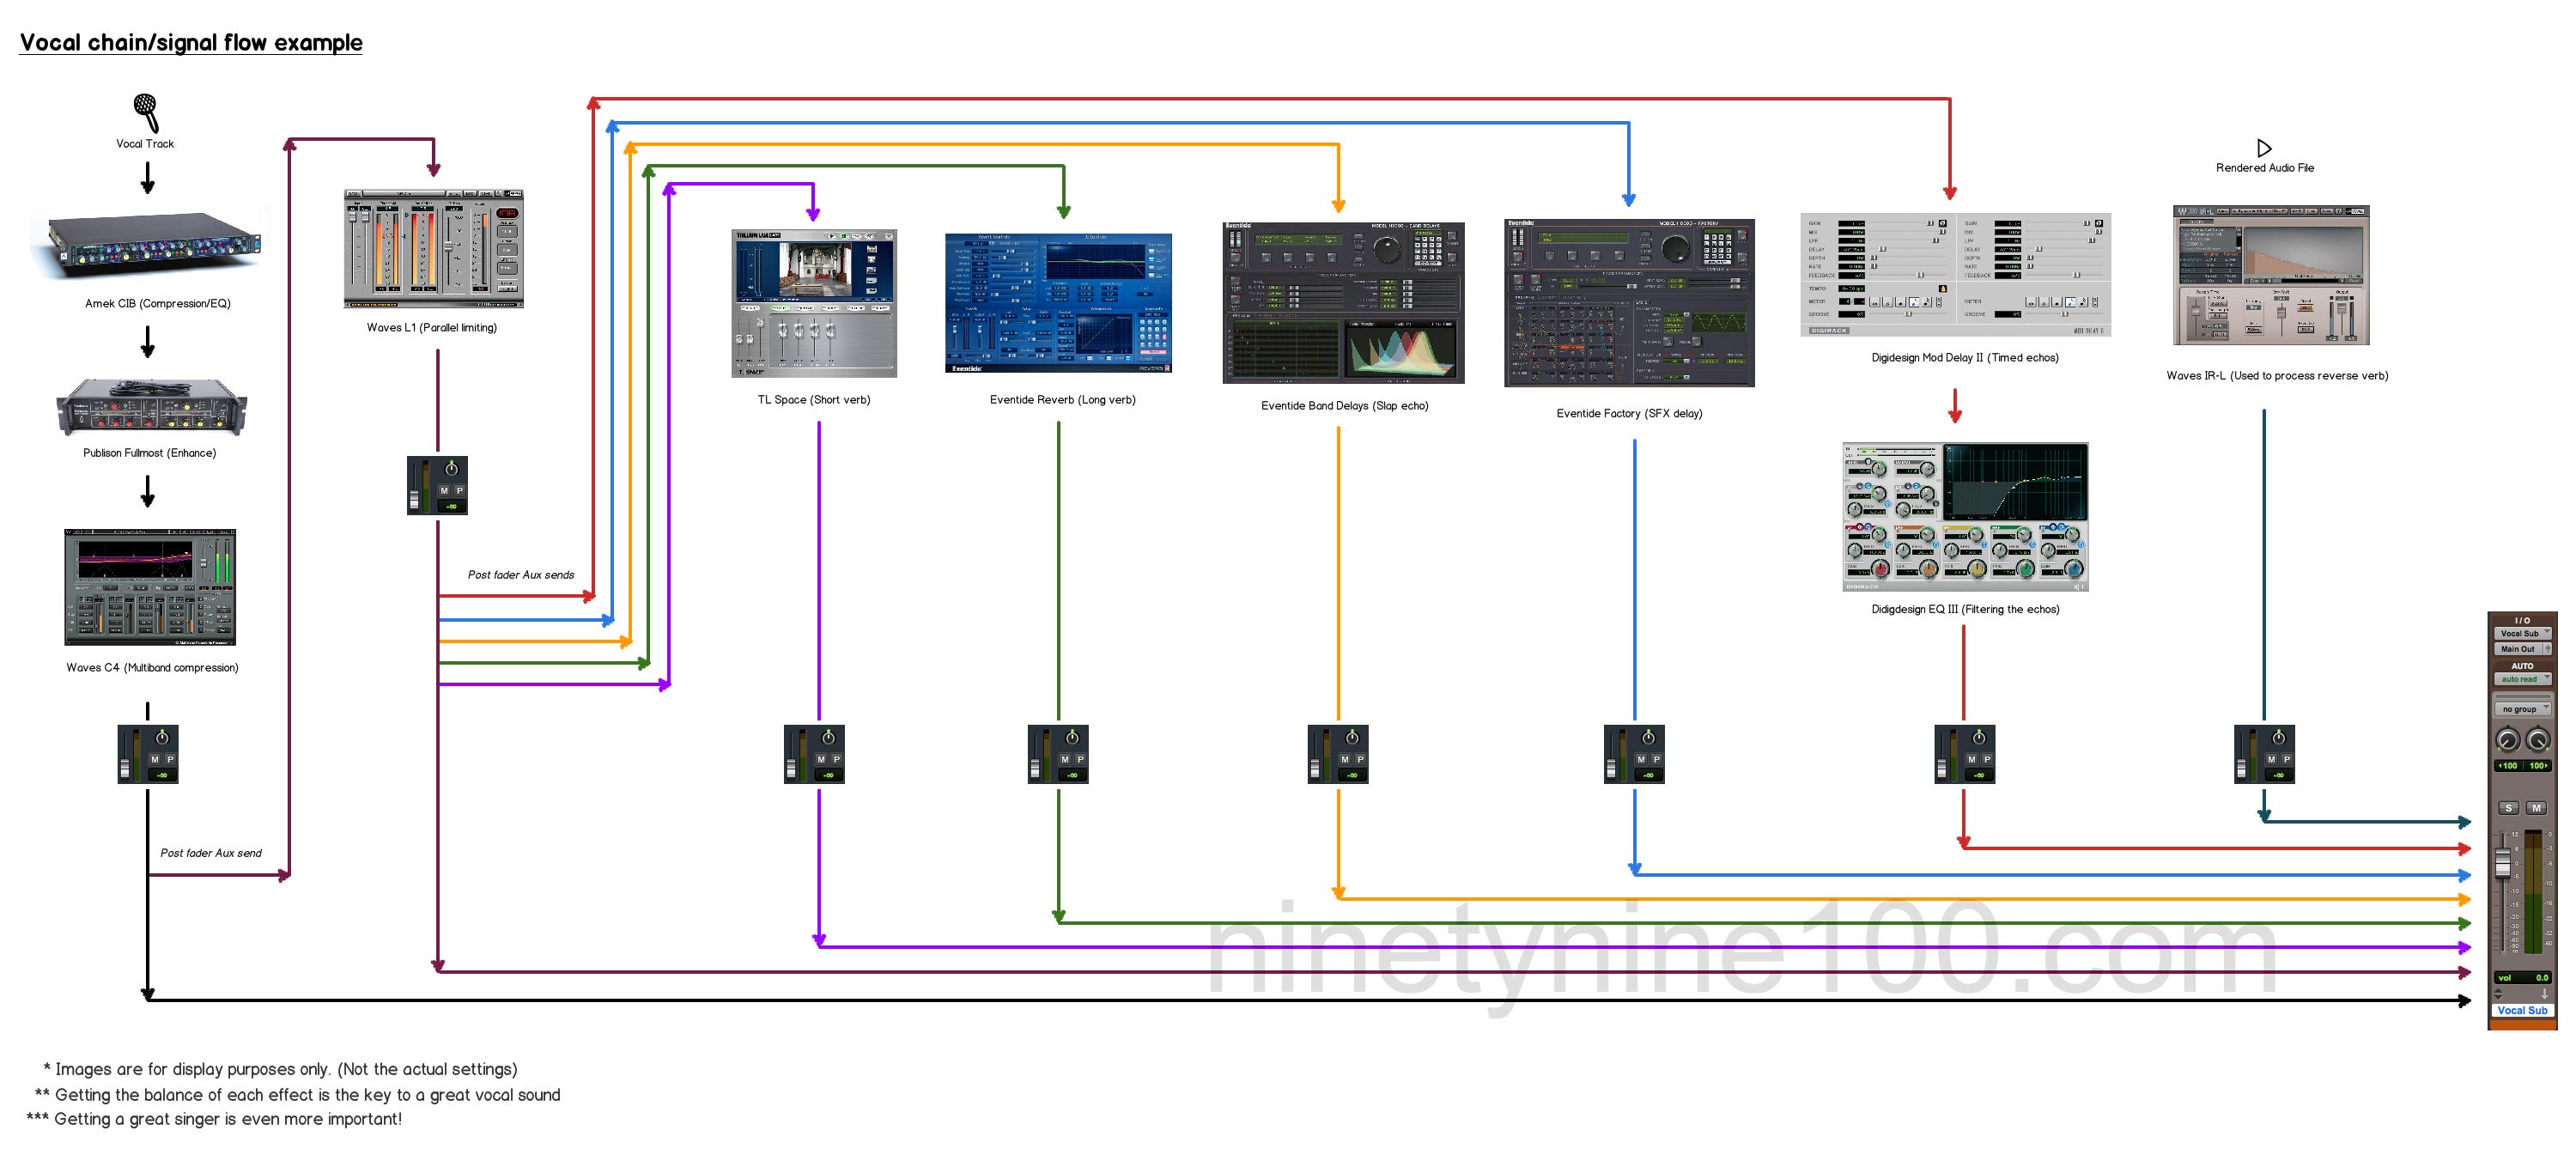
The above image shows the signal-chain I used on John’s track. You can click the image to view the details. Don’t get scared, I’m about to go through each step!
Below, you will hear each part of the signal-chain isolated. This way you’ll be able to hear exactly what each part sounds like individually, and then blended together. I like to consider parts like this: A “vocal sound” is really a combination of elements. In this case, the “vocal sound” was a meticulous balance of the elements below.
Dry vocal
This sample is what we call a ‘dry’ vocal. It is the unprocessed sound, as it was recorded. This was the sound source in both mixes.
The following audio files will demonstrate the sound of each part of my signal chain
This is one of an infinite number of possible signal chains.
Step 1 – Insert Effects
After processing with Insert FX You will hear more presence and detail, as compared to the ‘dry vocal’.
 The first thing I chose to do with this vocal, was pass it through my Amek Channel In A Box. I used the filter, EQ and compression in this piece of gear. I then patched the signal from the CIB, to my Publison Fullmost, which I used to add presence. The final processor I used as an insert, was the Waves C4 Multiband compressor. I set it in a way to add a silky top end, and tighten the low frequencies.
Step 2 – Parallel Compression
I split the ‘dry vocal’ using an Aux Send, passed the duplicate through the Waves L1 Limiter, then blended it with the dry vocal.
Note: I used this ‘compressed’ vocal, rather than the dry vocal, to send to the rest of the effects.
Vocal with parallel compression
Step 3 – Short Reverb
I sent the compressed vocal to a Reverb with a quick decay. Having a quick decay means you can have it louder in the mix, without drowning the vocal.
 The purpose of this short reverb, is to create a subtle ambience around the vocal. The ‘length’ of a reverb refers to its decay time. Specifically, the time it takes for the initial volume of the reverb to become 60db quieter. You may have seen RT60, on a reverb? That’s what it is referring to!
A short reverb decays very quickly. Set your decay time between 750 – 1200 ms. Also be sure that your pre-delay setting is less than 30ms, or you’ll hear a slight echo!
Step 4 – Long Reverb
I blended a reverb with a long decay. The volume of this reverb should be softer than the short reverb. This combination of the short and long reverb creates a big, lush reverb that feels more natural, and takes up less space in the mix than a single reverb with a long decay turned up loud.
 The purpose of this long reverb, is to add a lush, space around the vocal.
Try a decay between 1.5 – 2.8 seconds.
I also like to diffuse the reverb quite a lot because we are blending it with the short reverb. What we are really going for is a wide, soft reverb that has a long decay. The detail and initial presence will come from the short reverb.
Step 5 – Reverse Reverb
I created a reverse reverb, then automated the volume, turning it up before key words in the lyrics.
Creating the reverse reverb effect in a DAW is fairly simple.
- Duplicate the ‘dry vocal’ track.
- Select the audio region (include two bars before, and two bars after) and process it with a ‘reverse’ effect. In Pro Tools, use the Audiosuite plugin.
- Once the region has been reversed, choose a reverb and process the region.
- The final step: Select the region, and reverse it once more.
Now you’l have a cool reverb that begins before the voice!
Step 6 – Slap Echo
I split the ‘compressed vocal’ yet again, and sent it to a stereo delay effect. Setting up a short, slap echo, with slightly different times for the left and right channel, will help spread the vocal into the stereo field. It can also help the vocal jump out of the mix, especially if it’s the only sound with such an effect.
 A slap echo is a great way to make an instrument jump out of a mix. Setting up this sort of effect is quite simple. Choose any delay processor that allows you to set the left and right channel separately. Then experiment with different delay settings for each channel.
Try starting here: Left channel 155 ms, right channel 180. You would generally want to keep the repeats low, 2-3 repeats (this is your ‘feedback’ setting).
Step 7 – Timed Echoes
I chose to emphasise occasional lyrics, by automating an echo. I also chose to place the echoes between lyrics by echoing the last word/s of a line, so as to give them space.
Tip: Try automating effects after an echo. For example, you could have a filter, reducing the treble with each repeat until the echo sounds very low-fi.
Step 8 – Special Effects Delay
The weird and wonderful, to create subtle interest. There were a couple of places in the verse where I thought the song felt empty between lyrics. Rather than writing another part, I experimented by creating an ambience with the vocal, that would decay over these bars.
 This sort of effect should be applied on a case by case basis. The main thing to consider is that there could be an opportunity to create a special, one off effect specifically for the song you are working on.
In this case, it was an almost ridiculously dense, panning, delay/reverb. In another song, it maybe be a vocoder fed through distortion…
Step 9 – The New Vocal Sound – All of the FX together
This is what the vocal sounds like with each part blended together. The real key is creating the perfect balance between each of the effects, and the dry vocal.
Let’s hear the before and after again:
This version was mixed at home by the artist.
This is the version I mixed at ninety nine 100.
Hopefully this overview has provided some insight into professional audio production, and inspired you toward new ways of working with your vocal sound! Over the next few vocal How To Mix Vocals articles, I will discuss Insert effects (Compress/EQ/De-Essing), Pitch & Timing (Transparent tuning and timing correction) and Reverbs & Delays (Designing reverbs and delays for the song).
Until next time… Feel free to get in touch!
-SM
About The Author
Simon Moro has worked in the music industry for well over a decade, with a strong focus on record production and artist development. He has worked with Major and Independent Record Labels, on Primetime Network TV shows, lectured audio at RMIT, presented at various industry events and even released drum sample libraries as part of a side project, Indie Drums.
You can hear his recent work here.